Thai Curry Chicken Meatballs
These Keto Thai Curry Chicken Meatballs are perfect for a potluck or make-ahead lunches for two people for an entire week!
Real Recipes for Real Families
These Keto Thai Curry Chicken Meatballs are perfect for a potluck or make-ahead lunches for two people for an entire week!
This keto Instant Pot Buffalo Chicken Soup will satisfy your chicken wing cravings without the hassle of frying.

It’s time for the Super Bowl, and with that comes Super Bowl parties full of nachos and pretzels and popcorn and pizza. Whether you’re hosting or going to someone else’s shindig, these great snacks will make sure you have something to eat while you’re watching the big game! In this post I have four delicious recipes for you: Fried Mozzarella Sticks, Fried Pickle Spears, Everything Bagel Deviled Eggs, and Chicken Wings with Italian Herb Butter.
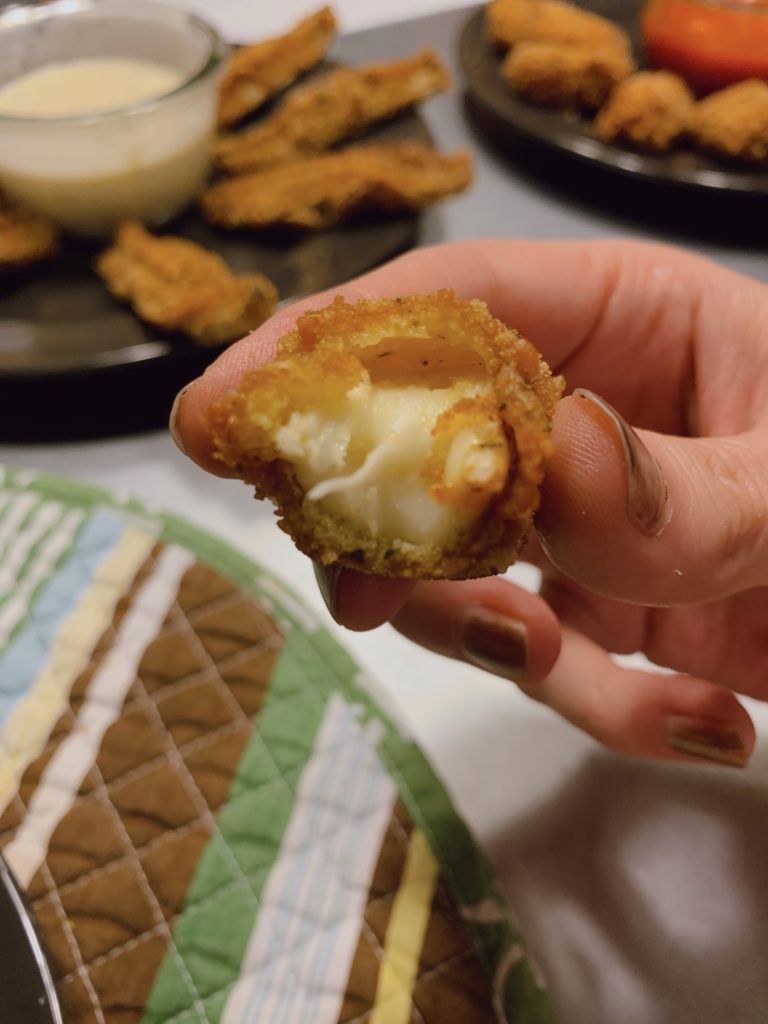
I was for sure these were not going to turn out, and I was going to have an oozing, weeping mess of cheese leaking out of sad breading when I fried them. Amazingly, they both look and taste awesome. My kids especially adored them and we were fighting over them. The recipe is somewhat time-consuming, but it’s absolutely worth it.
The reason why it’s time-consuming isn’t necessarily the cooking or prep part of it. You have to make these ahead of time so you can freeze them. You bread them twice, otherwise you’ll end up with the oozing, weeping mess, and you freeze them so the cheese doesn’t completely melt before the breading cooks when you fry them. Freezing them between breading also helps ensure that you get a nice even coating of breading that doesn’t have any gaps in it.
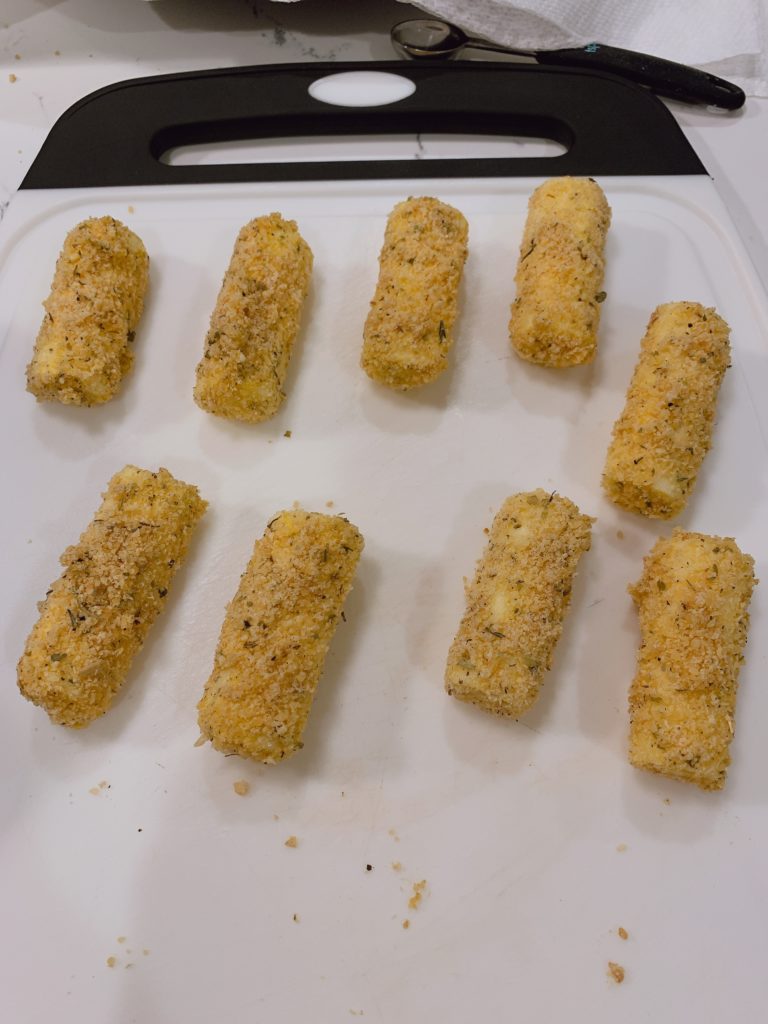
To begin this recipe, unwrap 6 mozzarella string cheese sticks and cut them in half crosswise to make 12 shorter sticks. Beat an egg in a small bowl and set it aside. On a dinner plate, mix together 1/4 cup of pork rind crumbs, 1/4 cup of grated parmesan cheese, a teaspoon of Italian seasoning, and 1/4 teaspoon of garlic powder. Grind some black pepper into it as well. You won’t need any additional salt for these, as the ingredients themselves are plenty salty on their own. Dip each piece of cheese into the egg, then dredge into the crumb mixture, making sure to coat all sides as thoroughly as you can. I rolled them in the crumbs and then pressed more crumbs onto the sides. Try not to leave visible cheese, but if you do, the next coat should cover them. Put the finished sticks on a plate lined with parchment paper and put it in the freezer for at least an hour. If you have any extra egg, put it in the fridge for later.
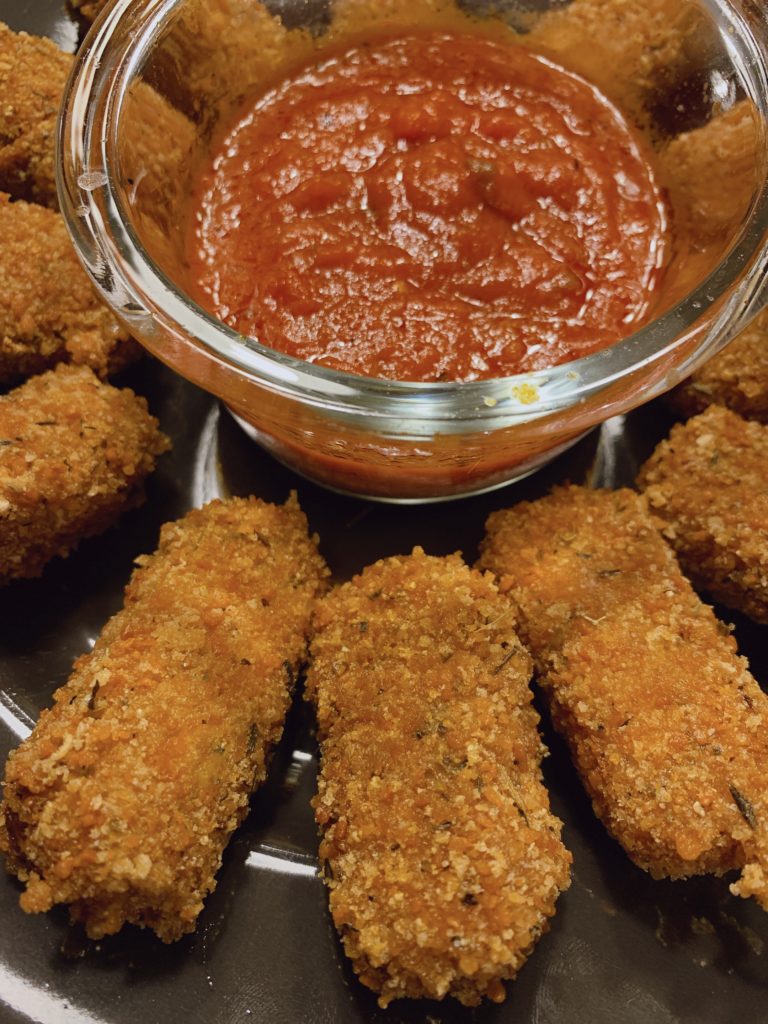
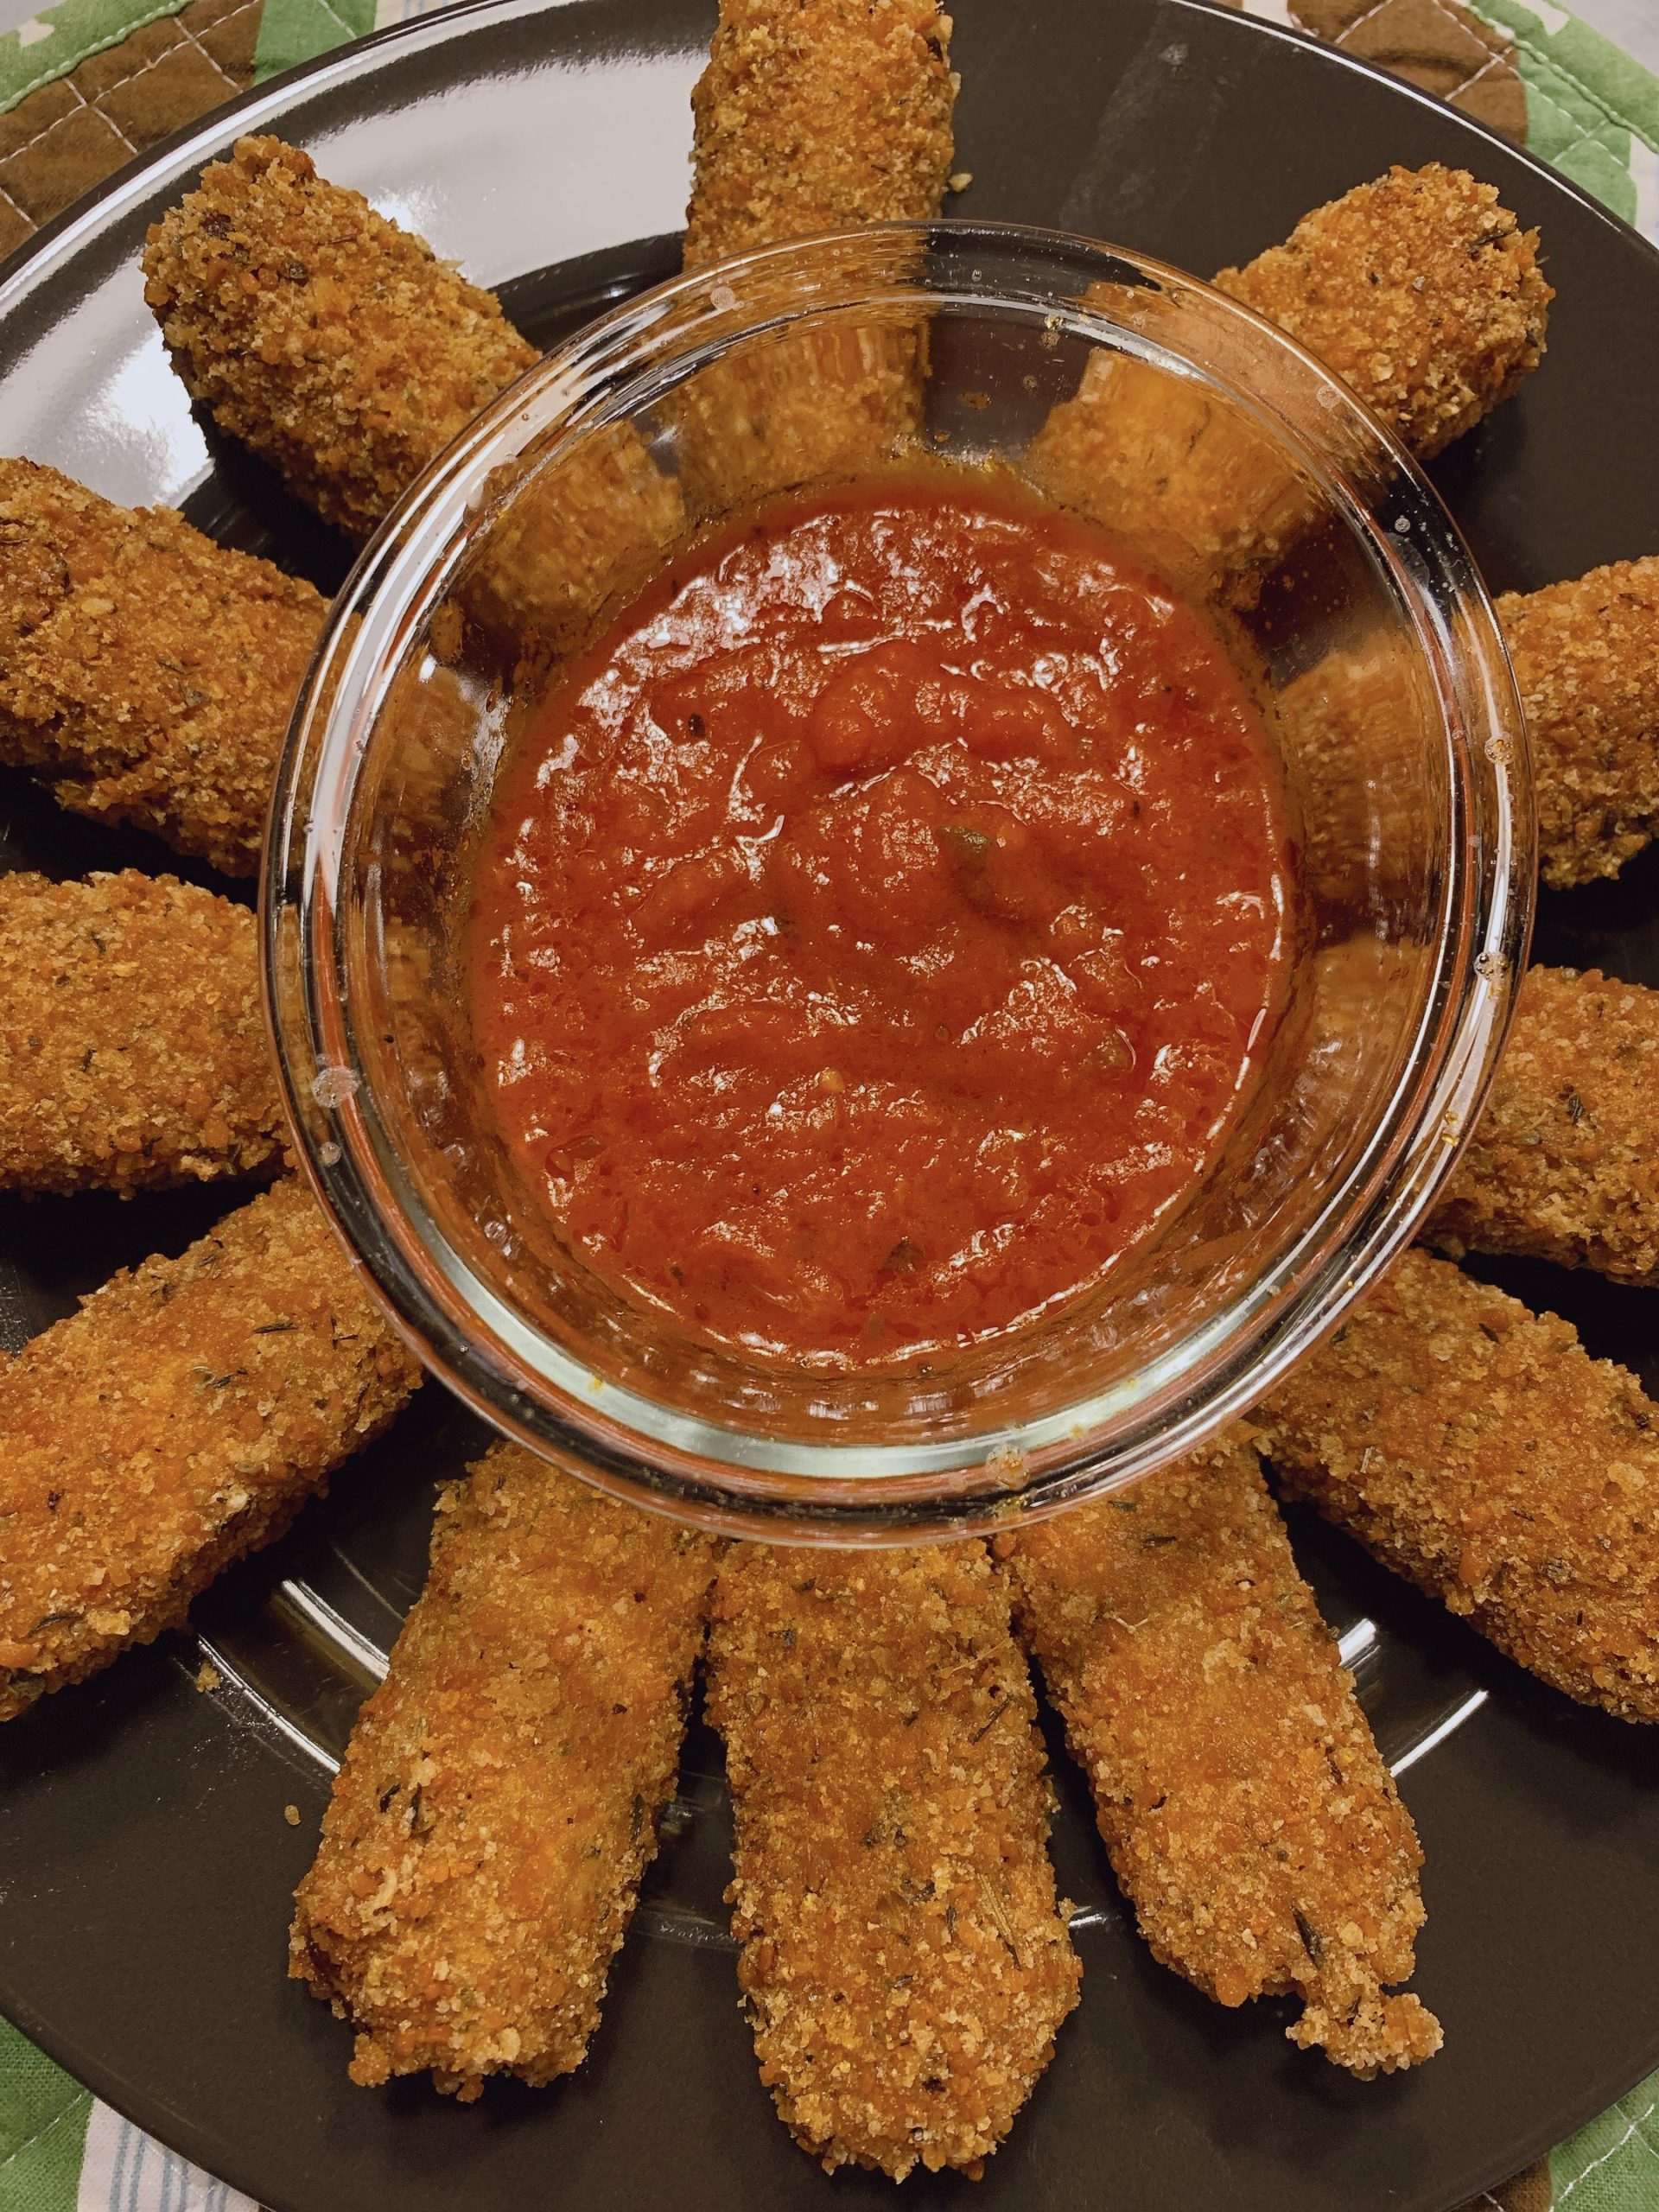
When you’re ready to do the second layer, get out the leftover egg from before and mix the same ingredients on a new plate. Remove the plate with the mozzarella sticks from the freezer and quickly repeat the egg and breadcrumb dredging. Really press those crumbs into the frozen cheese sticks. Once they’re finished, put the plate back in the freezer and heat up the oil. You’ll need two cups of avocado oil for this one, because any less and it won’t coat the sides enough. You don’t want to have to flip these more than once when they’re in the oil. I like using an enameled cast-iron skillet for these, to reduce the chance of them sticking to the bottom. Heat the oil over medium-high heat until it reaches 375-400 degrees (using an infrared thermometer to check the temperature of oil in the skillet). When the oil reaches the proper temperature, remove the plate from the freezer and use tongs to gently lower the cheese sticks into the oil, one at a time. Be careful not to squeeze them too hard with the tongs, as you don’t want to dislodge any of the breading. By the time that you get all 12 of them into the oil, the first one should be golden brown on the bottom. Very carefully turn it with the tongs. If you squeeze too hard, you run the risk of breaking the breading. I use these silicone-headed tongs for a nice soft grip. Continue turning the cheese sticks in the order you put them into the pan, until they’re all turned. Continue frying for 1-2 minutes at most, until both sides are evenly golden brown, then use the tongs to remove them to a cookie sheet lined with paper towels. If you’re not serving these immediately, you can put them in an oven set to 200 degrees, but these are best straight out of the fryer. Serve them with a warm marinara sauce for dipping. Make sure the sauce has no sugar added!
When I made these, I prepared them with the mozzarella sticks, so I didn’t end up wasting oil. They use a lot of the same ingredients as the cheese sticks as well, so it’s all pretty convenient. Plus, it’s like getting a bunch of bar food all at once, so you really feel like you’re cheating on keto even when you’re not!
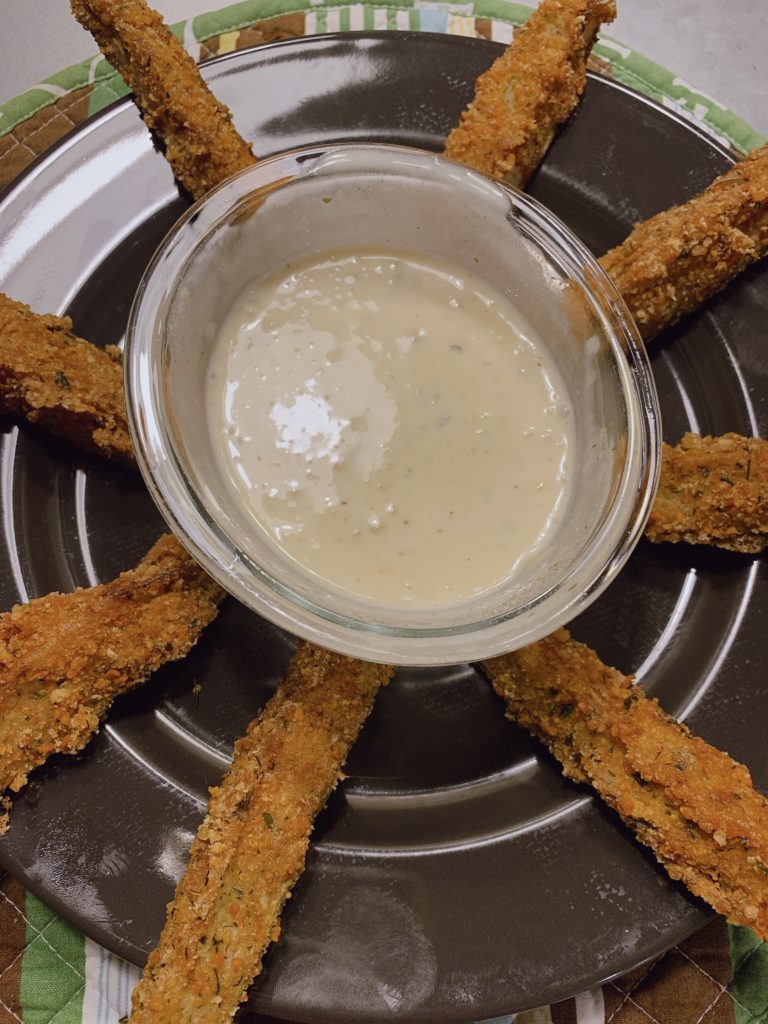
You’ll need twelve dill pickle spears, which is about a full jar of pickles. If you can, find the kind that you get in the refrigerator section, because they turn out crunchier. These don’t have to be frozen and double-battered like the cheese sticks do, but it’s best if you dry the pickles off as thoroughly as possible. Otherwise, the breading doesn’t stick as well and the oil splatters a lot. If you’re dealing with a time crunch, you can pat them dry with paper towels, but if you have time, dry them on a wire cooling rack for an hour or two. If you’re doing it like me and making the cheese sticks at the same time, this is perfect to do while they’re in the freezer.
When you’re ready to bread and fry, you’ll be doing it in one fell swoop, so set your breading station up right next to the oil. Heat up two cups of avocado oil in an enameled cast-iron skillet to 375-400 degrees, using an infrared thermometer to check the temperature. While the oil is heating, beat an egg in a small bowl, and on a large plate, mix together 1/2 cup of pork rind crumbs, 1/2 cup of grated parmesan cheese, a teaspoon of dried parsley, and 1/4 teaspoon of dried dill. Grind in some black pepper as well. Dip a pickle spear in the egg, dredge it in the crumb mixture until fully coated, and use silicone-headed tongs to carefully place it in the oil. Repeat with the remaining pickles. When all the pickles are in the oil, the first one is likely ready to be turned, so flip it carefully to make sure the remaining breading is under the oil. Continue flipping the rest of the pickles in the same order you placed them in the pan. When they get to an even golden brown on both sides, remove them from the oil and place them on a plate lined with paper towels to drain off the frying oil. Serve immediately with ranch dressing for dipping. These can keep in a 200-degree oven for a few minutes while you fry the cheese sticks, so if you’re serving them both, definitely fry these first.


I love deviled eggs. I don’t know what it is about them. I couldn’t eat six hard-boiled eggs if you paid me, but hand me a dozen deviled eggs and I’m gonna toss those down my gullet like I’m a python. I’ve never met a deviled egg I didn’t like, unless you make those gross kind with all the sweet pickle relish. I’m always disappointed when I pop a deviled egg in my mouth and it’s super sweet. But I digress.
I’ve always hated making deviled eggs, because mine always come out looking like they got run over by a car. I don’t know if it’s because I use eggs that are too fresh or what, but I can never peel them without gouging huge chunks out of them. So when I went to make this recipe for the blog, I decided that I was going to watch those YouTube tutorials on how to make hard-boiled eggs that are easy to peel. I ended up settling on putting salt and apple cider vinegar in the water, and let me tell you, it worked! The eggs I used were fairly new, and they peeled like a dream. So I will highly recommend that you do the same, for all your hard and soft-boiled egg needs.
So to get started, put a dozen eggs into a large pot and fill it with cold water until the eggs are covered by at least an inch or two. Add two tablespoons of salt and a tablespoon of apple cider vinegar to the water, then put the pot over high heat until it just hits a vigorous boil. You’ll want to make sure to watch the pot, because as soon as it begins boiling, you need to turn off the heat entirely and cover the pot with a lid. Set a timer for 12 minutes, and while you’re waiting, fill a large mixing bowl at least halfway with ice. When there’s about a minute left on the timer, add cold water to the bowl. As soon as the timer goes off, remove the lid from the pot and extract the eggs with a wok skimmer or a slotted spoon. Put the eggs in the ice bath and let them sit for another ten minutes.
To peel the eggs, smack them gently on the counter all over the surface of the egg to create some cracks, then place the egg on the counter and roll it under the palm of your hand. Then pick it up, find the place with the most cracks, and begin to peel from there. The shell should come off without much resistance at that point. Rinse the peeled eggs to remove any tiny flecks of eggshell that may be remaining, and place them on a cutting board.
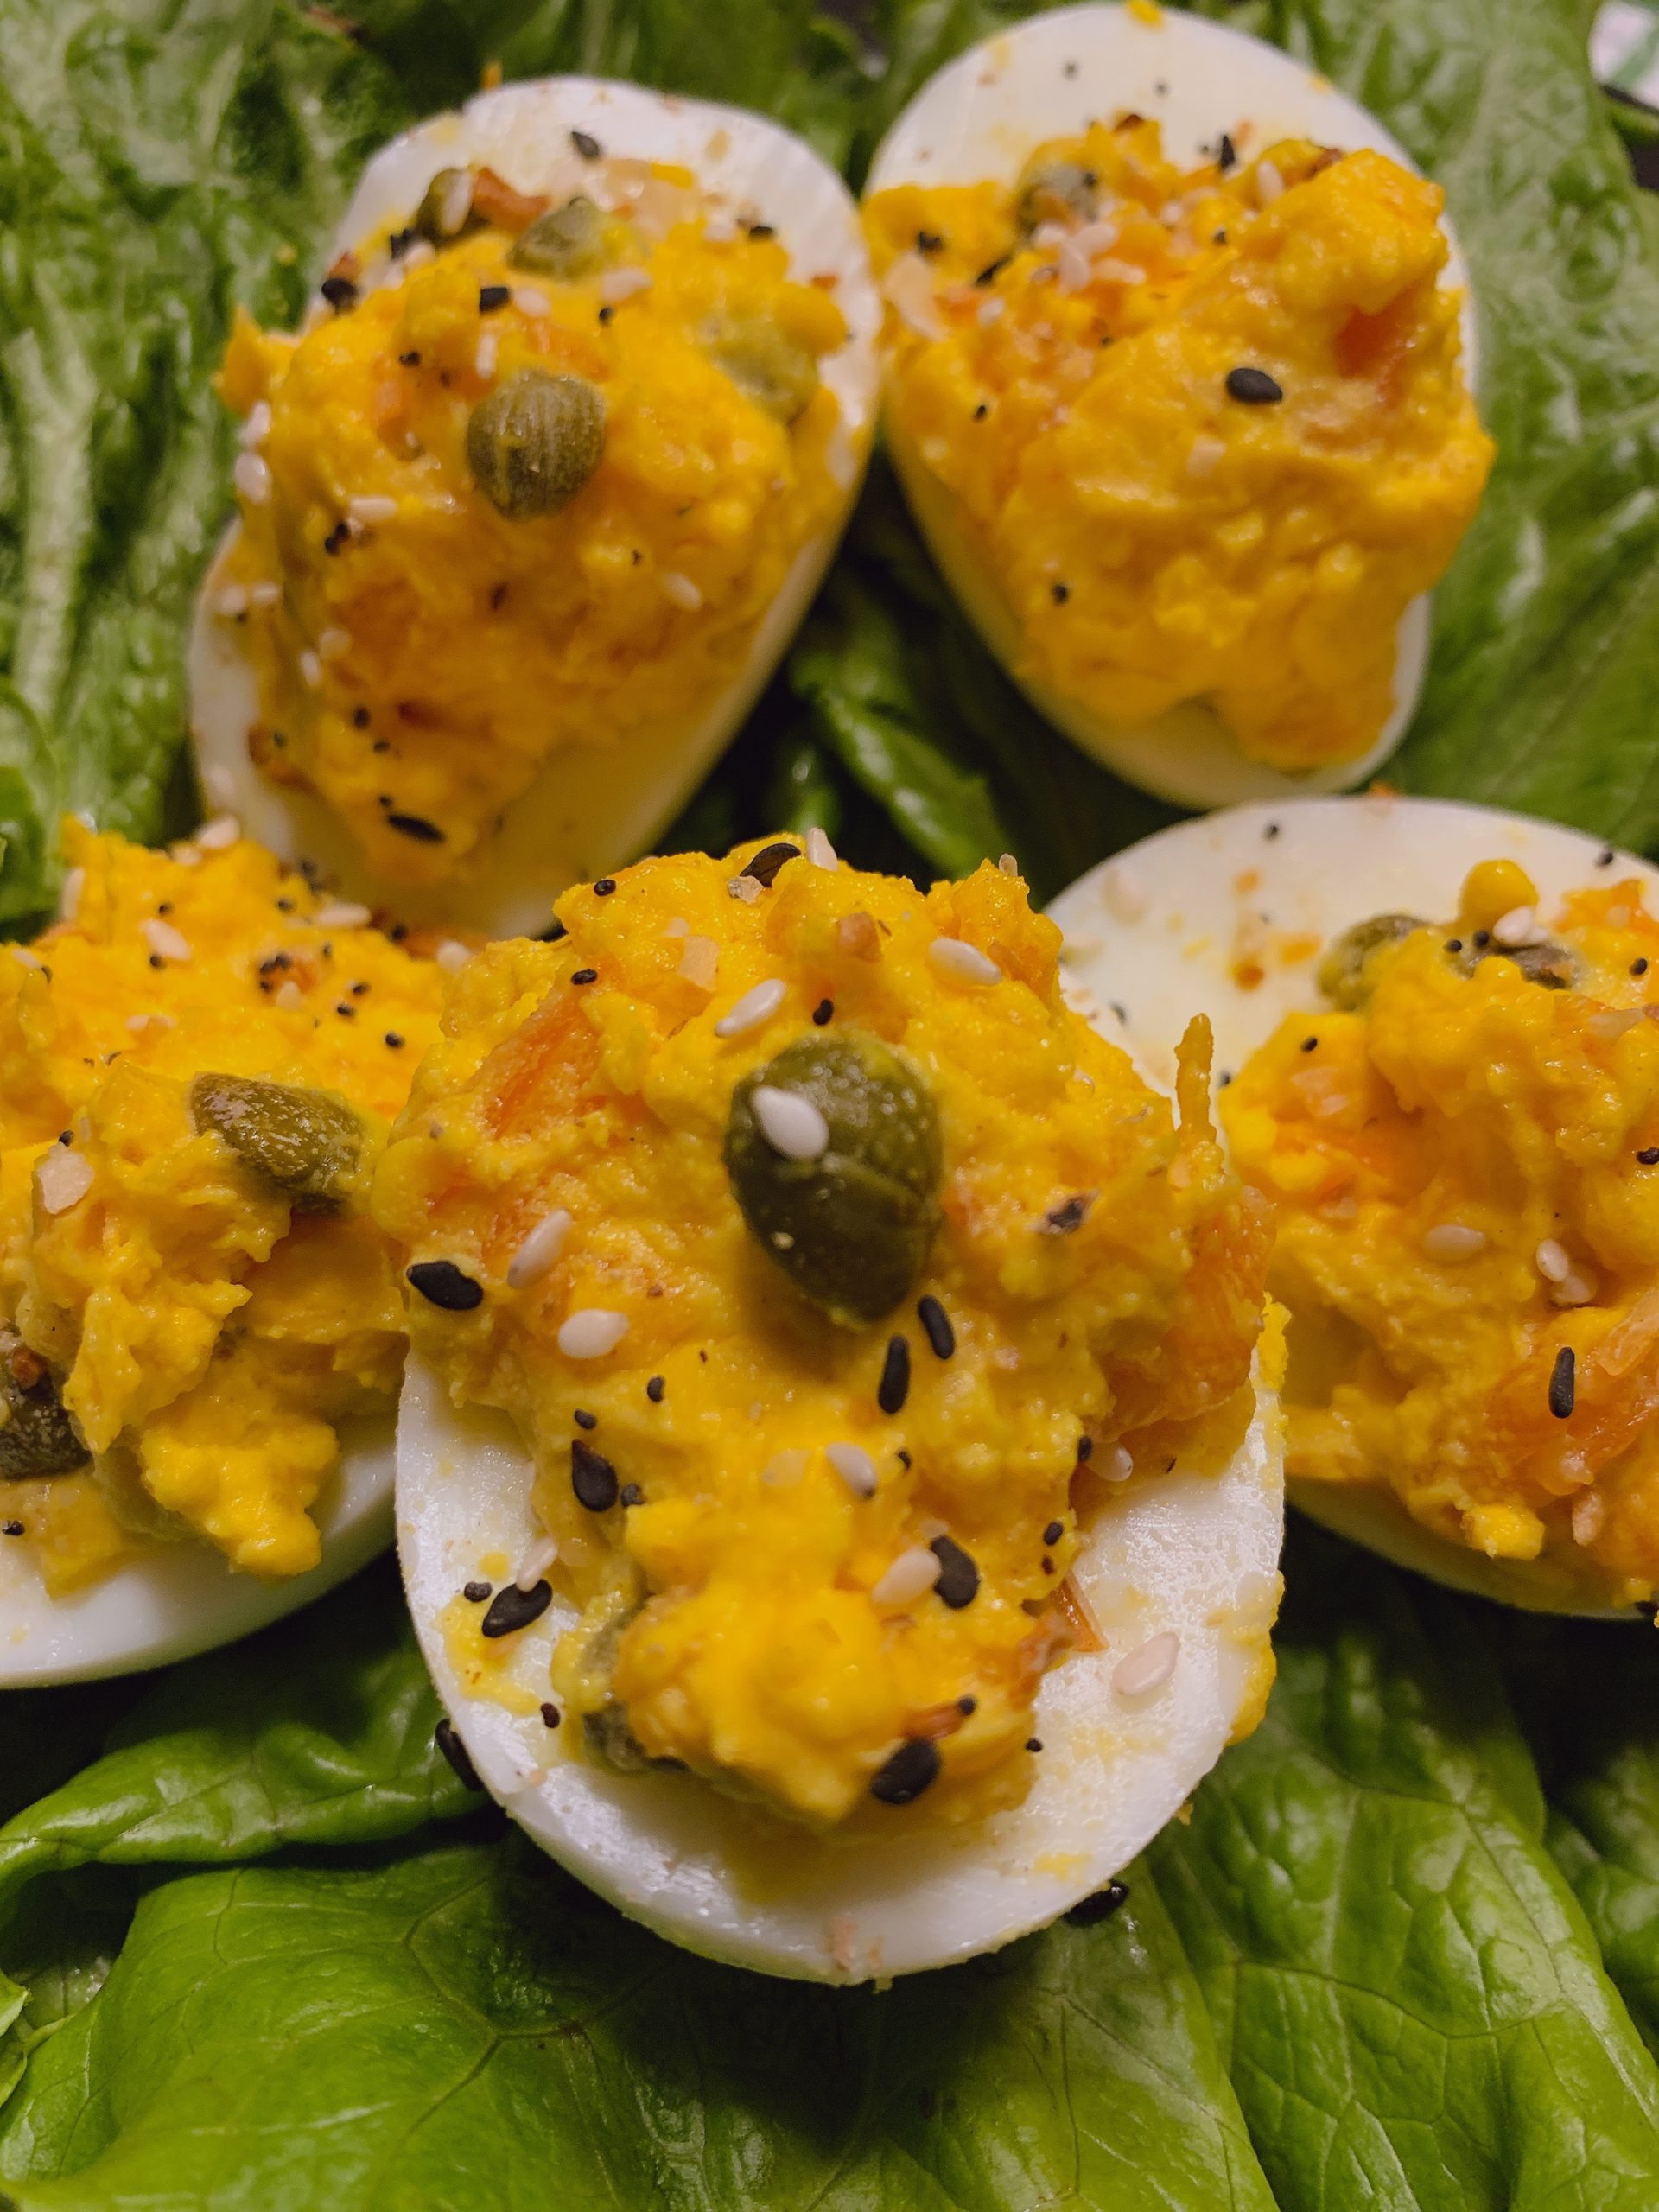
When all the eggs are peeled, drain the water from the ice bath bowl, give it a quick rinse with soap and water, and dry the inside of the bowl off with paper towels. We’ll be using that to make the filling. Cut the eggs in half lengthwise and carefully scoop out the yolks. Put the yolks in the bowl and leave the whites on the cutting board for now. Add 1/4 cup of mayonnaise and a teaspoon of dijon mustard to the yolks, and then mash them with a potato masher until they make a chunky paste.
Push the egg whites to the side of the cutting board and chop 4 ounces of cold-smoked salmon, also known as lox. You’ll want these in about 1/2-inch or smaller pieces. Put those in with the egg yolks and use the potato masher on them again until the salmon is incorporated. Drain the liquid from 2 tablespoons of capers and stir those into the eggs with a spoon. Don’t use the potato masher on the capers, because they’ll squish. Add white pepper and salt, if necessary, as well as extra mayonnaise if your mixture is a bit too dry. I found that the salmon and capers made the mixture salty enough, but your mileage may vary. I did not use any extra mayonnaise, but whether or not you’ll need it depends on the size of your egg yolks.
Scoop out the mixture by scant tablespoonfuls and place them into the reserved egg whites. Don’t worry about making these look pretty. They’ll be overfilled and chunky, so you’re going for a rustic look. When they’re all filled, sprinkle them with everything bagel seasoning, then put them in the fridge until you’re ready to serve them. If you’re taking them to a party, you can put them in one of those fancy deviled egg holders, otherwise just throw them on a plate. They won’t last long, I promise.

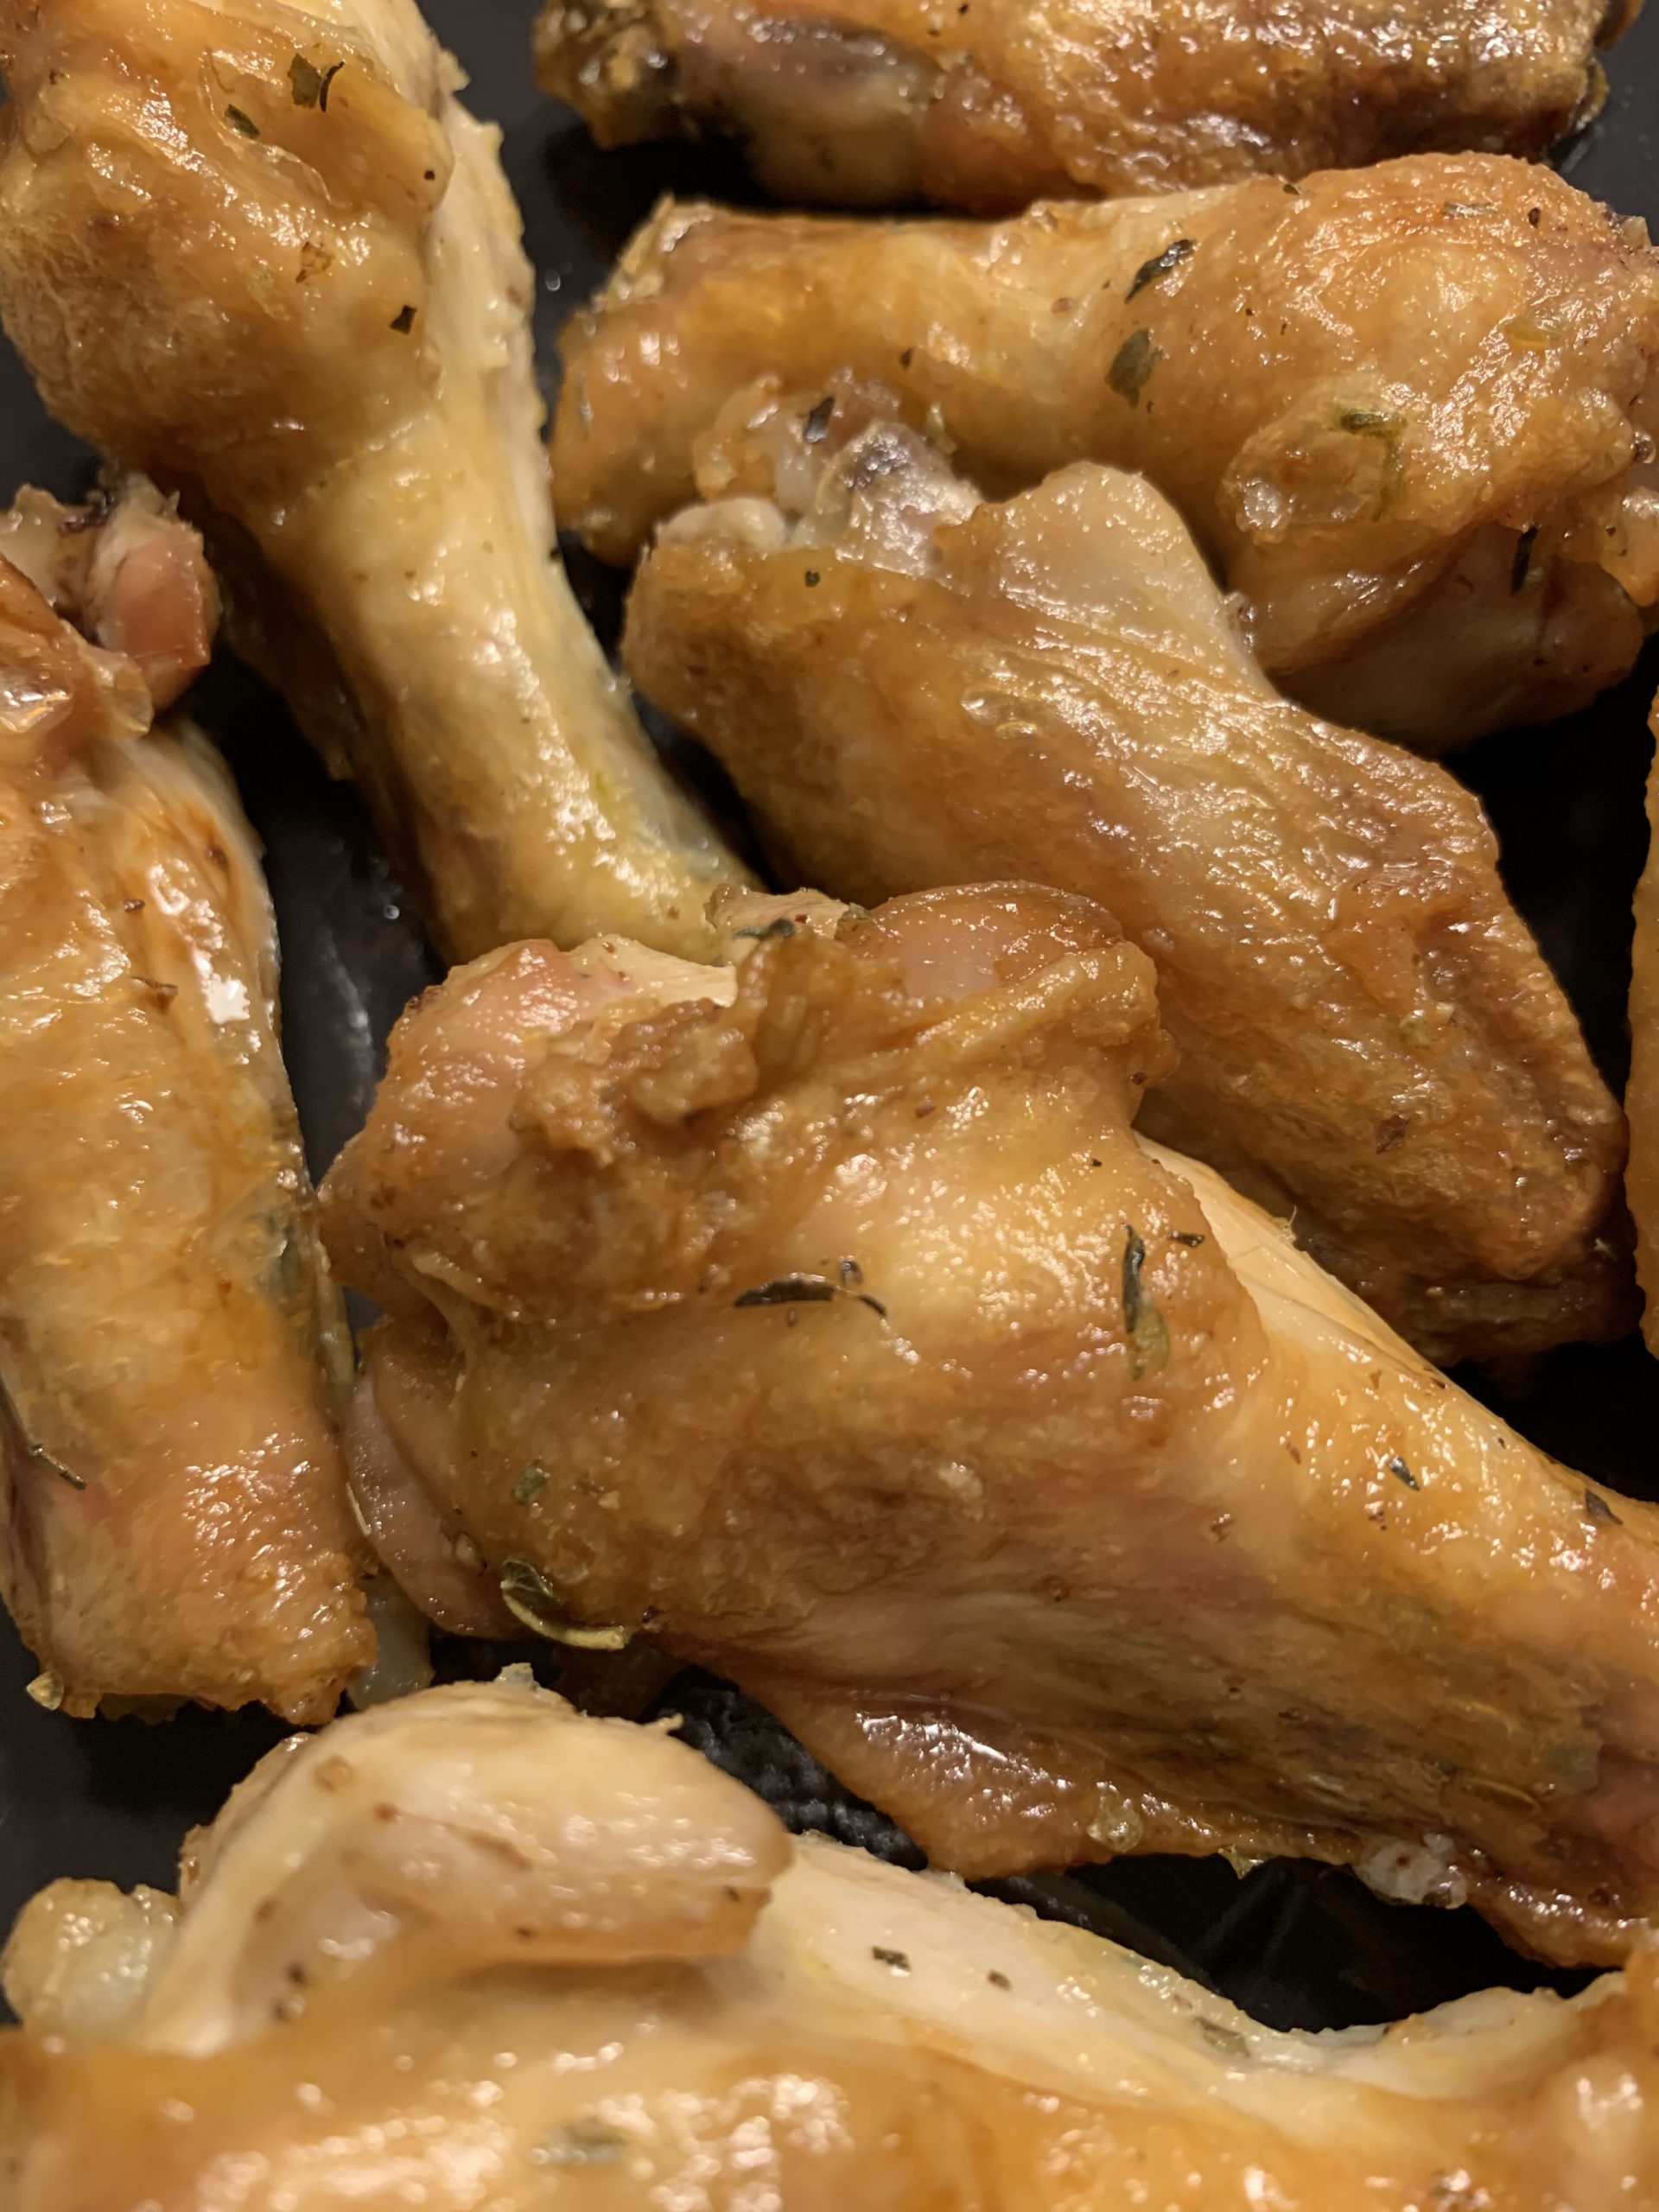
I may have mentioned this before, but my stepfather and his family are from Buffalo, hence why I have recipes like my Beef on Chaffleweck on the blog. About the only Western New York food I haven’t tried to tackle is the garbage plate, and frankly I’m not sure if I should, even if I could. I have yet to post a wing recipe on here, mainly because the standard “Buffalo” wing recipe is really simple. For mild wings just mix equal parts butter and Frank’s Red Hot sauce and toss the wings in them. Serve them with blue cheese dressing and celery. It’s barely a recipe at all.
But this wing recipe, while almost as simple as the standard “Buffalo” wings (nobody in Buffalo calls them that, which is why I put it in quotes), is not something you’ll find just anywhere. There’s a small hidden gem of a restaurant in our neighborhood, one of those places where the owner goes around and greets every table. Tommy knows almost all of his regulars by name, and he’s one of those characters who never runs out of stories to tell you on a slow day or late night at the bar after the kitchen closes.
It’s one of my favorite places to grab a bite to eat in town, and that’s mainly because of his wings. They’re always perfectly crispy and piping hot. I burn the roof of my mouth every time, because I just can’t wait until they cool down a bit to eat them. They do a special wing every week, so you never know what he’s going to come up with. Coffee, cocoa and chipotle dry rubbed wings? Sure. Watermelon butter and habanero pepper? I’m not even sure what that is, but it was amazing. But the wings I’m about to describe to you are my favorite ones he ever did. The crazy thing is that they’re not even spicy at all, and I love a good hot chicken wing. These ones were rubbed in Italian spices and drizzled with butter, but there was some sort of crazy umami thing going on there where it was much more savory than it should have been with just those two ingredients. Even my kids loved them. I went nuts trying to figure out what it could possibly be, but I know better than to ask Tommy to hand over his trade secrets.
I figured out the secret after some experimentation for last year’s Super Bowl, and it was so simple that I hated myself for not figuring it out sooner. All it needed was a little bit of chicken boullion, and suddenly it was elevated from good wing to God-tier wing. There’s something about the combination of ingredients that just clicks, and it’s so simple to do. This will be the centerpiece of your Super Bowl party for sure.
First off, you need to decide if you’re baking or frying your wings. Either way, you’re going to need 3-4 pounds of them. If you’re baking, set your oven to 400 degrees, line a rimmed cookie sheet with aluminum foil, and put a wire cooling rack on top of it. Put the wings in a large mixing bowl, toss them with a teaspoon of salt, 2 tablespoons of avocado oil, and several grinds of pepper. I used white pepper for this, but black works as well. Put the wings on the rack, put the whole shebang in the oven, and bake them for 50 minutes. Turn the sheet halfway through so they cook evenly, since ovens do tend to have hot spots.
To fry them, heat up at least a quart of your favorite frying oil in a cast-iron Dutch oven until it’s 375-400 degrees. Separate the wings into drums and flats and fry them in batches. Most recipes will tell you to fry wings for 10 minutes. That’s not enough to get the skin crispy. When you don’t fry them enough, you get flabby, rubbery skin, and that’s gross. So fry them in batches, drums first and flats second, for 12 minutes. And as an aside, unless you’re in Buffalo, order your restaurant wings well done. It’ll change your life. When the first batch is done, put it in a warm oven and do the second batch. They sauce better if you do them all at once.
To make the sauce, melt four tablespoons of butter and a half tablespoon of Better than Bouillon chicken base in a large heat-safe mixing bowl in the microwave. If you don’t have a microwavable heat-safe bowl, you can do the melting on the stovetop and transfer it into the bowl. Add two teaspoons of Italian seasoning, crushing it in your hands or a mortar and pestle to make the texture more fine. When the wings are done, toss them in the bowl to coat with the sauce, and serve them immediately so they don’t lose their crispiness.
As an Amazon Associate I earn from qualifying purchases. Any embedded link to a product earns me a portion of the purchase price if you click and buy it.
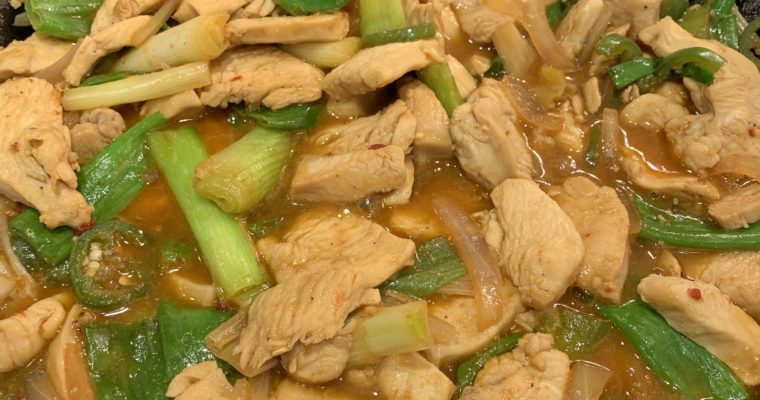
Have your favorite spicy Chinese takeout food guilt-free with this easy to make low-carb and keto Szechuan chicken recipe!

A spicy, creamy, cheesy keto soup with the flavor of jalapeño poppers, made in the Instant Pot. Perfect for a chilly fall afternoon!
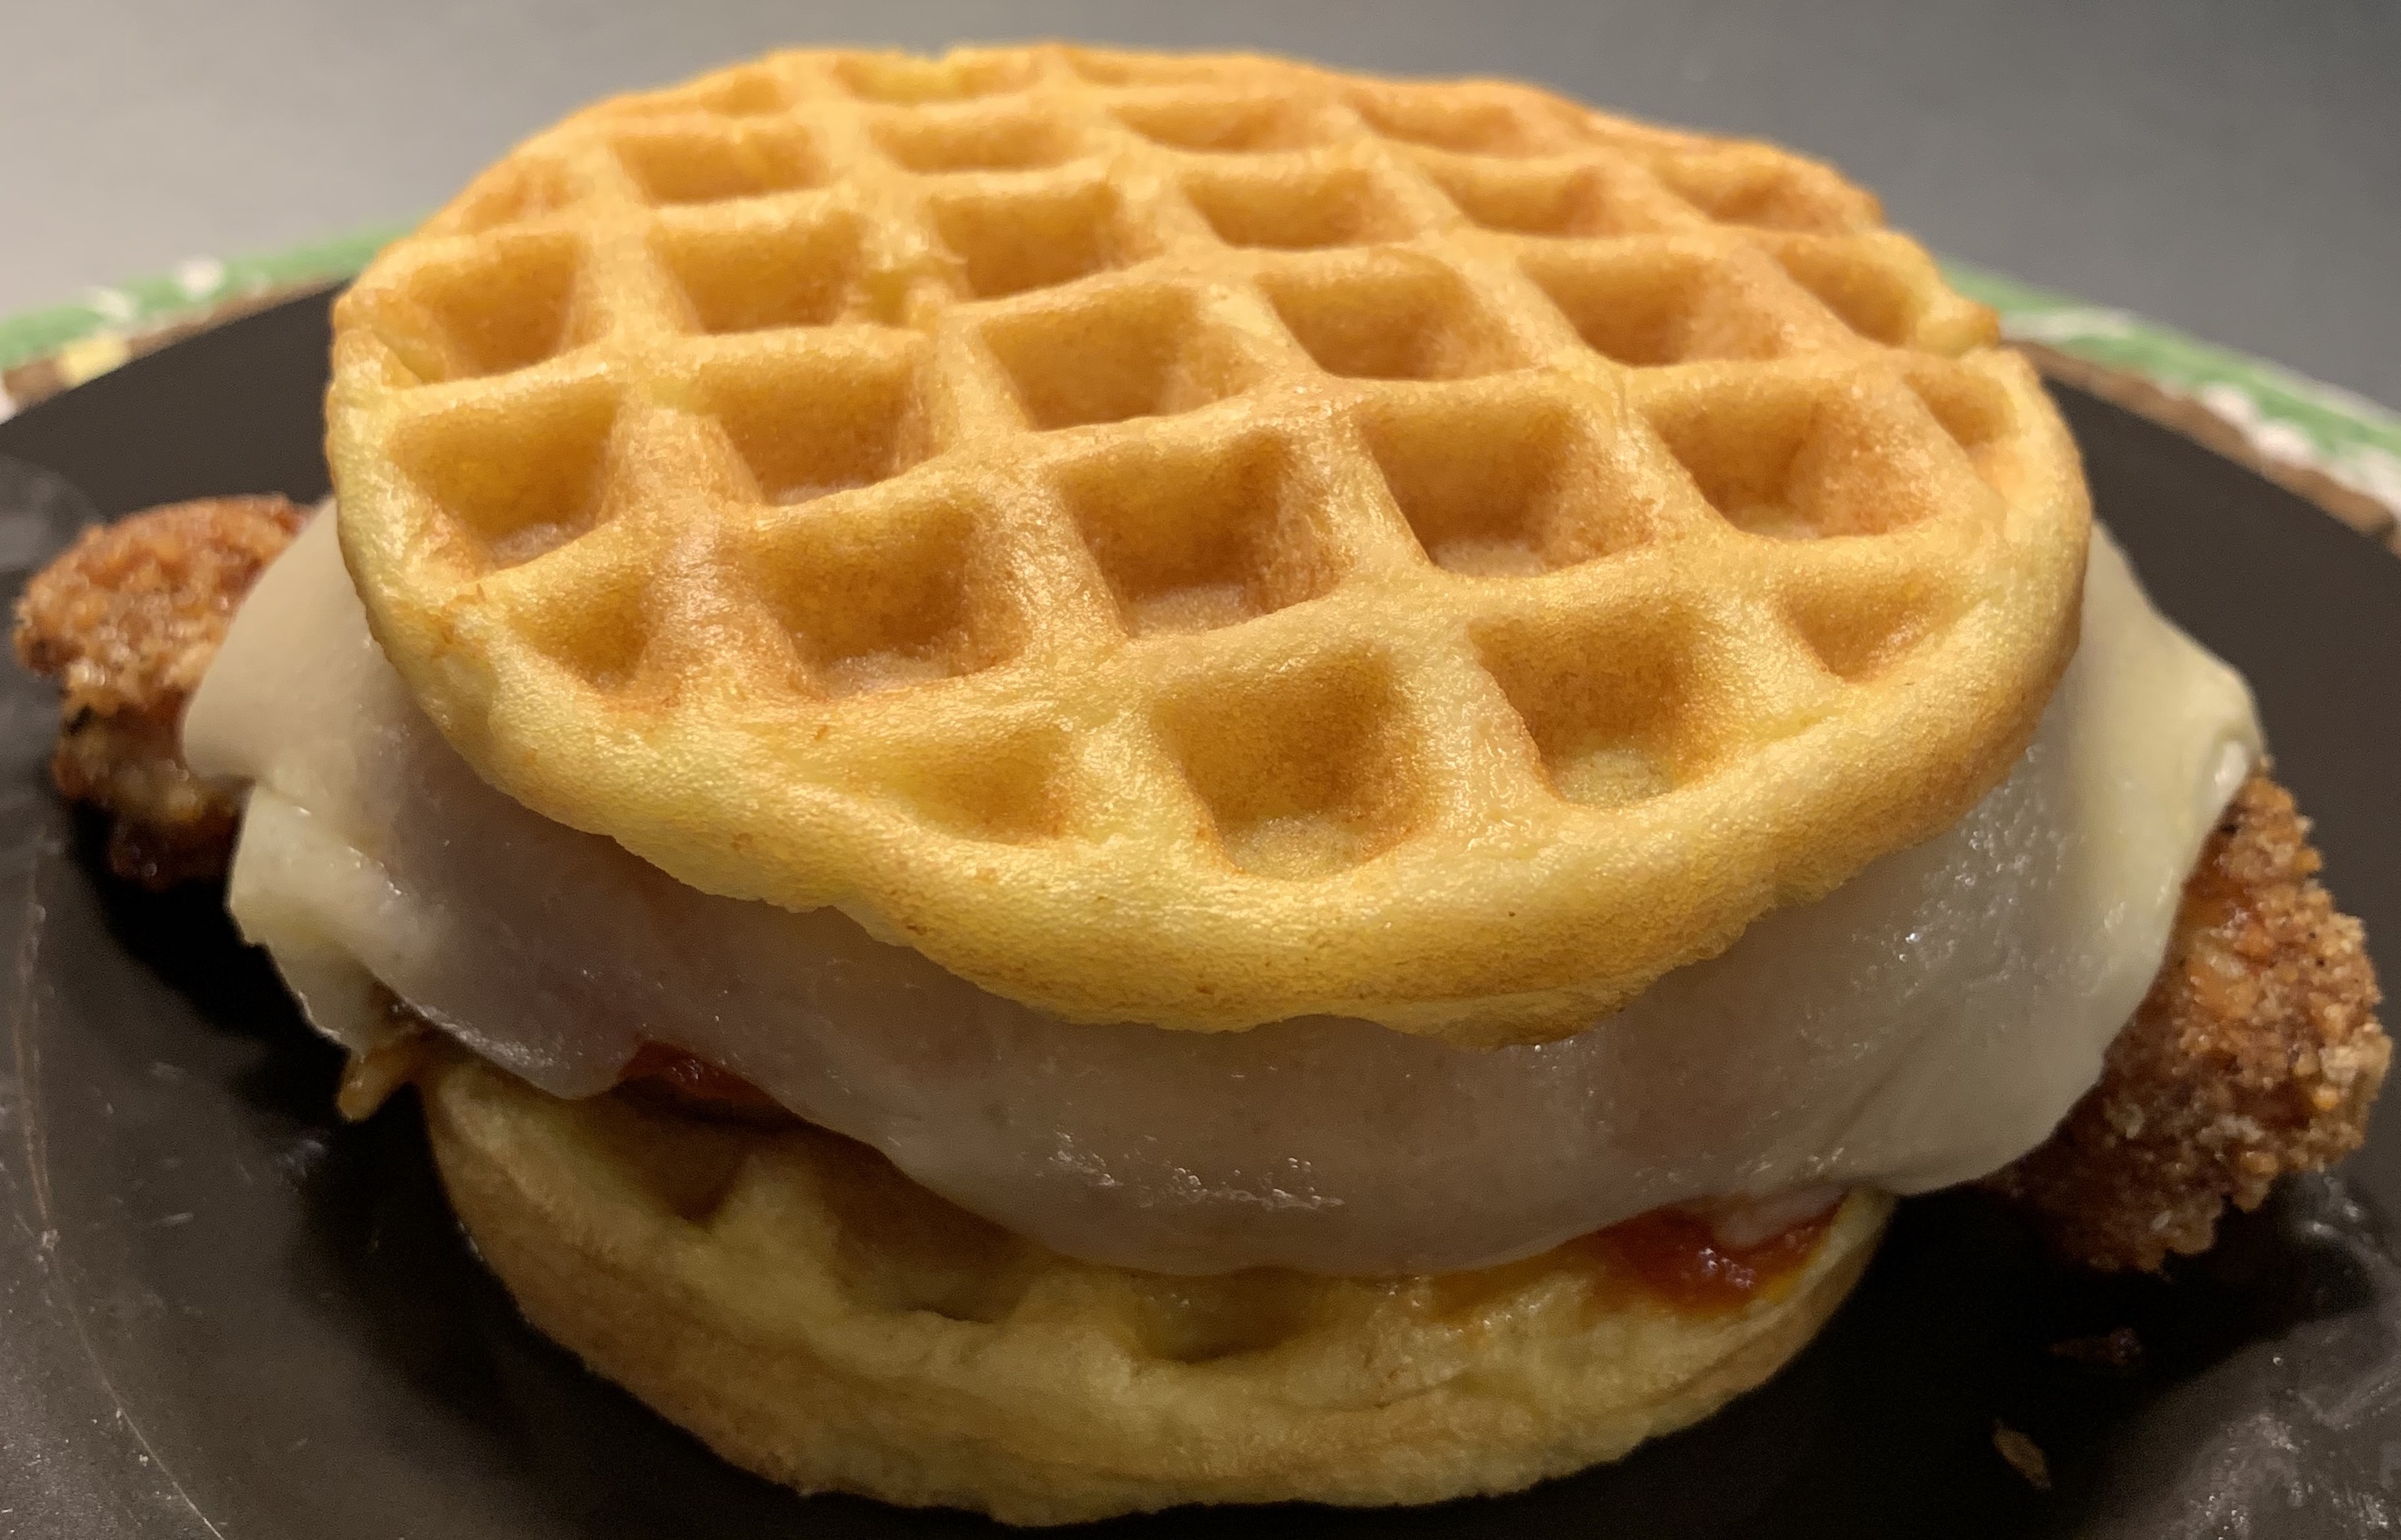
I can’t make this recipe without getting that Nationwide jingle with Peyton Manning stuck in my head, so now you have it stuck in your head too. I’m just that kind of person. But all earworms aside, this is one of the most kid-friendly meals I make. Both of my kids love it, which is saying something because they have vastly different tastes. It’s also really versatile. You can serve it over zoodles, Miracle Noodles, hearts of palm noodles, or regular noodles if your family isn’t keto. Last night, I made myself a couple of chaffles and the family ate theirs on sub rolls.
It’s not a tough recipe to make, either. Last night I had to hit the gym, pick up the girl child from school, take a shower, and have it on the table before my husband and the boy child got home from soccer practice. And I got it done early, so I had to put their sandwiches in a warm oven to wait for them.
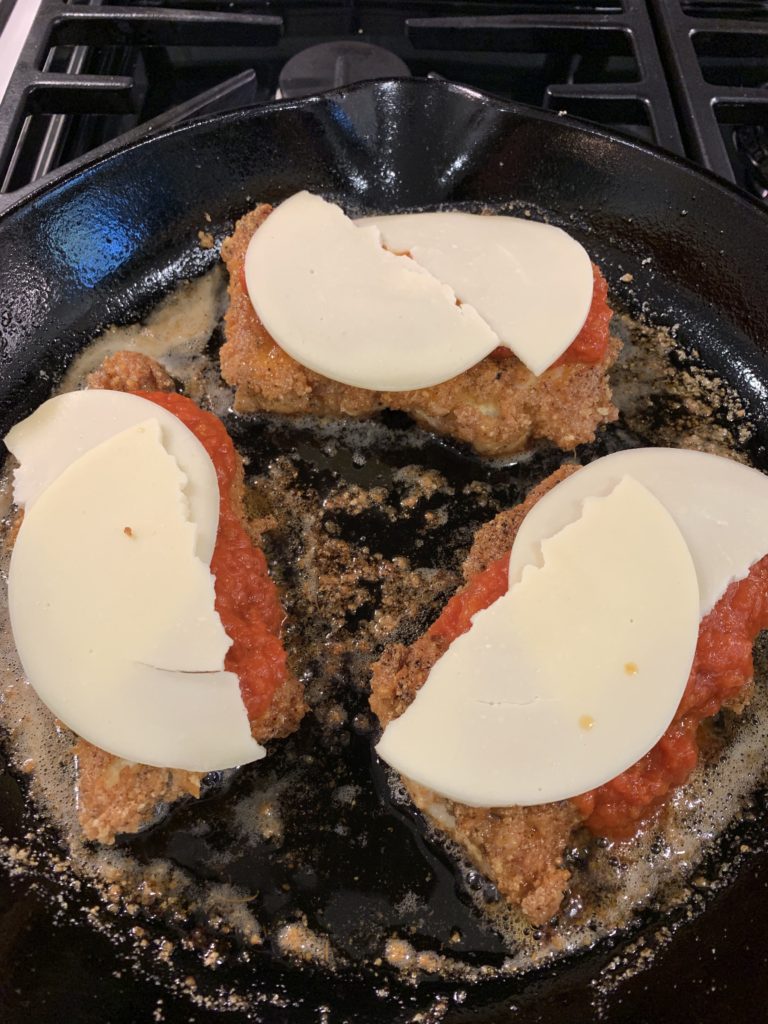
First, preheat your oven to 350 degrees. You’ll get started with 4 chicken thighs or breasts. I’ve done it with both and it turns out well no matter what. Just do what’s better for your macros. You’ll want it to be about a pound of meat total, although if you go over a little that’s no big deal. Too much and you’ll run out of breadcrumbs, so be careful. Pound them to about 1/4 inch thickness and set them aside.
With the chicken prepped, start heating 1/4 cup of oil in an enameled cast iron skillet over medium high heat, so it’s ready by the time you’re finished with the breadcrumbs. Avocado oil is best for frying because of its high smoke point, but I like a little olive oil flavor in this one, so I usually go 3 tablespoons of avocado oil to one tablespoon of olive oil. Once you get that going, start the breadcrumbs. If you’ve read my other recipes, you know how this starts. Mix together 1/2 cup of parmesan cheese and 1/2 cup of pork rind crumbs, then mix in a teaspoon of salt, a teaspoon of Italian seasoning, a half teaspoon each of garlic powder and onion powder, and however much black pepper you want. Put that on a large plate, then beat an egg in a small bowl. Set the whole thing up next to your stove.
Take the largest piece of chicken, dip it in the beaten egg to coat, dredge it in the crumbs until it’s well-coated, then gently place it into the hot oil. Repeat with the next largest one, down to the smallest. Fry them for about 4 minutes per side, turning them gently with tongs to avoid knocking off the breading, then remove them from the heat but keep them in the pan. Top each with 1/4 cup of marinara sauce, making sure that the sauce you use does not have sugar listed in the ingredients. I prefer the Rao’s brand. Normally I’d link to it on Amazon but their prices are obscene. Go to Costco or shop the sales at your grocery store and stock up when it’s on sale. After you put on the sauce, top each piece of chicken with a slice of provolone cheese. I usually tear the slices in half so I can get them to cover more of the chicken. Once you put the cheese on, put the whole skillet in the preheated oven until the cheese melts, about 10 minutes. Remove them from the oven and serve immediately.
Since I made sandwiches this time, I decided to whip out the trusty Dash and make the recipe for Wonder Bread chaffles I’ve seen going around. It’s just an egg beaten with a tablespoon of almond flour, a tablespoon of mayonnaise, 1/8 teaspoon of baking powder, and a teaspoon of water. Because there’s no cream cheese, you don’t need a blender for it. It turned out okay, IMO. It reminded me of cloud bread. My main issue with it is that it was a bit softer in texture and had some trouble holding up to this type of sandwich, and that it’s a bit higher in calories than most chaffles because of the mayonnaise. I want to try it again replacing the mayonnaise with a tablespoon of cream cheese, and maybe adding 1/8 teaspoon or so of a liquid sweetener like Sukrin Gold Fiber Syrup in order to replicate that hint of sweetness that’s in Wonder Bread. It would be great with some peanut butter and sugar free jelly, though. But I digress.
To serve these, either slap them on your bread substitute of choice, or put them on your pasta substitute of choice. If you use pasta, you may want to add some extra sauce. Just make sure you add that to your macros!

As an Amazon Associate I earn from qualifying purchases. Any embedded link to a product earns me a portion of the purchase price if you click and buy it.
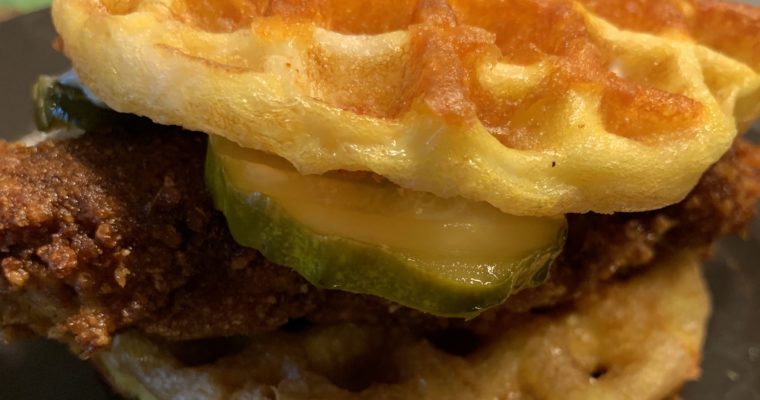
No more feeling left out of the Nashville Hot Chicken trend! This keto version will make you feel the burn…in a good way.
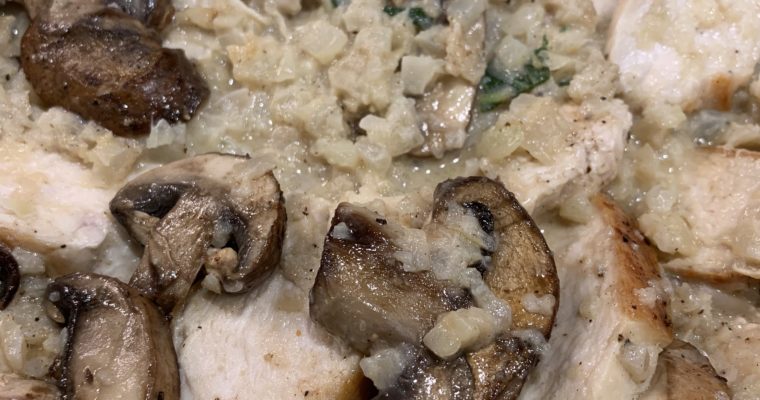
An elegant cauliflower risotto with browned butter, sage, parmesan, chicken, and mushrooms. Decadent and healthy all at once!
My husband and I got married in Jamaica, and even before that, I had a soft spot for Jamaican food. I love the blend of spices, and the heat doesn’t drown out the flavor, it enhances it. When we were down there, I ate jerk chicken or pork almost every day, and eventually when I feel like making it again, I’ll also post my jerk pork recipe. But today is something different.
This recipe is inspired by one I found on a sadly now-defunct recipe website called Jamaican It Paleo several years ago. It was a delightfully spicy chicken curry stew with greens and sweet potatoes, and while it took forever to make, I ate it frequently. Obviously, once I switched over to keto, that stew became off-limits because of the sweet potato. I always meant to try to recreate it without the sweet potato, but I haven’t gotten around to it until now.
There are several keys to this recipe that I’ll mention in here. The first is the Jamaican curry spice. This is not the same as regular curry powder, so don’t substitute that. I am lucky to have a local spice market that carries it, so I just use that. If you buy yours, just make sure the mix doesn’t contain added sugar! If you can’t find it, there are multiple recipes online. This one seems to be pretty standard. All of the ingredients except for the fenugreek can usually be found in your local grocery store. The fenugreek can easily be found in an Indian grocery, as it’s frequently used in Indian food as well. You’ll need 1/4 cup of the spice blend for this recipe. The other key is what you do with it. Most recipes just call for adding the spices in after the meat cooks. You’ll want to coat the meat with it and let it sit and marinate for at least a couple of hours. The longer you let it sit, the more flavorful your end product will be.
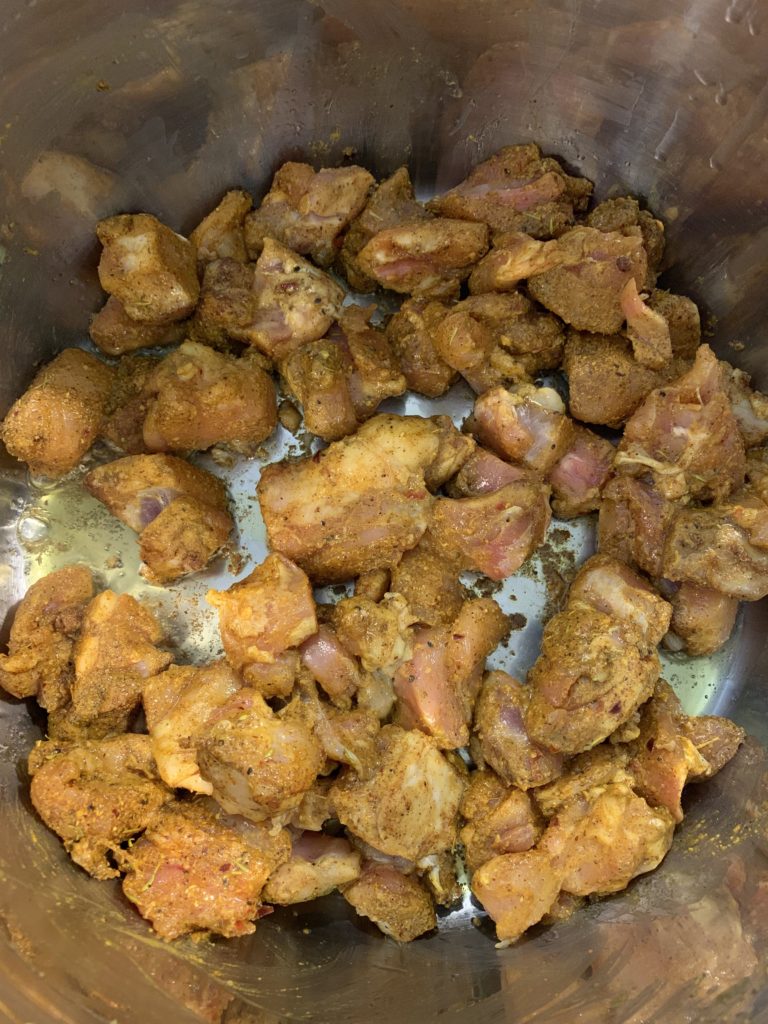
So now that you know the crucial deets, let’s get started on the actual recipe. Cube 3 pounds of chicken breasts into bite-sized chunks, then put it in a gallon-sized Ziploc bag and toss in 1/4 cup of Jamaican curry powder. Make sure all the pieces are coated, and put it in the fridge for at least 2 hours. When you’re ready to cook it, set your Instant Pot to saute and add 2 tablespoons of avocado or coconut oil. You’ll want to cook the chicken in two or three batches. They don’t need to get brown and crusty, they just need to cook part-way and toast the spices. Stir them frequently, as the batches might be large enough that not every piece touches the bottom of the Instant Pot very well. Each batch should take about 6-7 minutes max.
While the first batch is cooking, chop half a medium onion, and, using gloves, remove the stem and seeds of one Scotch bonnet or habanero pepper and mince it finely. If you have ventilation in your kitchen, turn it on, and if not, open a window. Remove the first batch of chicken, add two more tablespoons of oil, and put in the second batch of chicken along with the onion and pepper. When it’s close to done, add a tablespoon of garlic and saute for another minute, then stir in a cup of chicken broth and scrape up all the lovely brown spices from the bottom of the pot. Add a can of coconut milk and set the pot for the Soup setting, or for about 30 minutes if your pressure cooker doesn’t have that particular setting. Allow for ten minutes of natural release, then use the quick release after that.
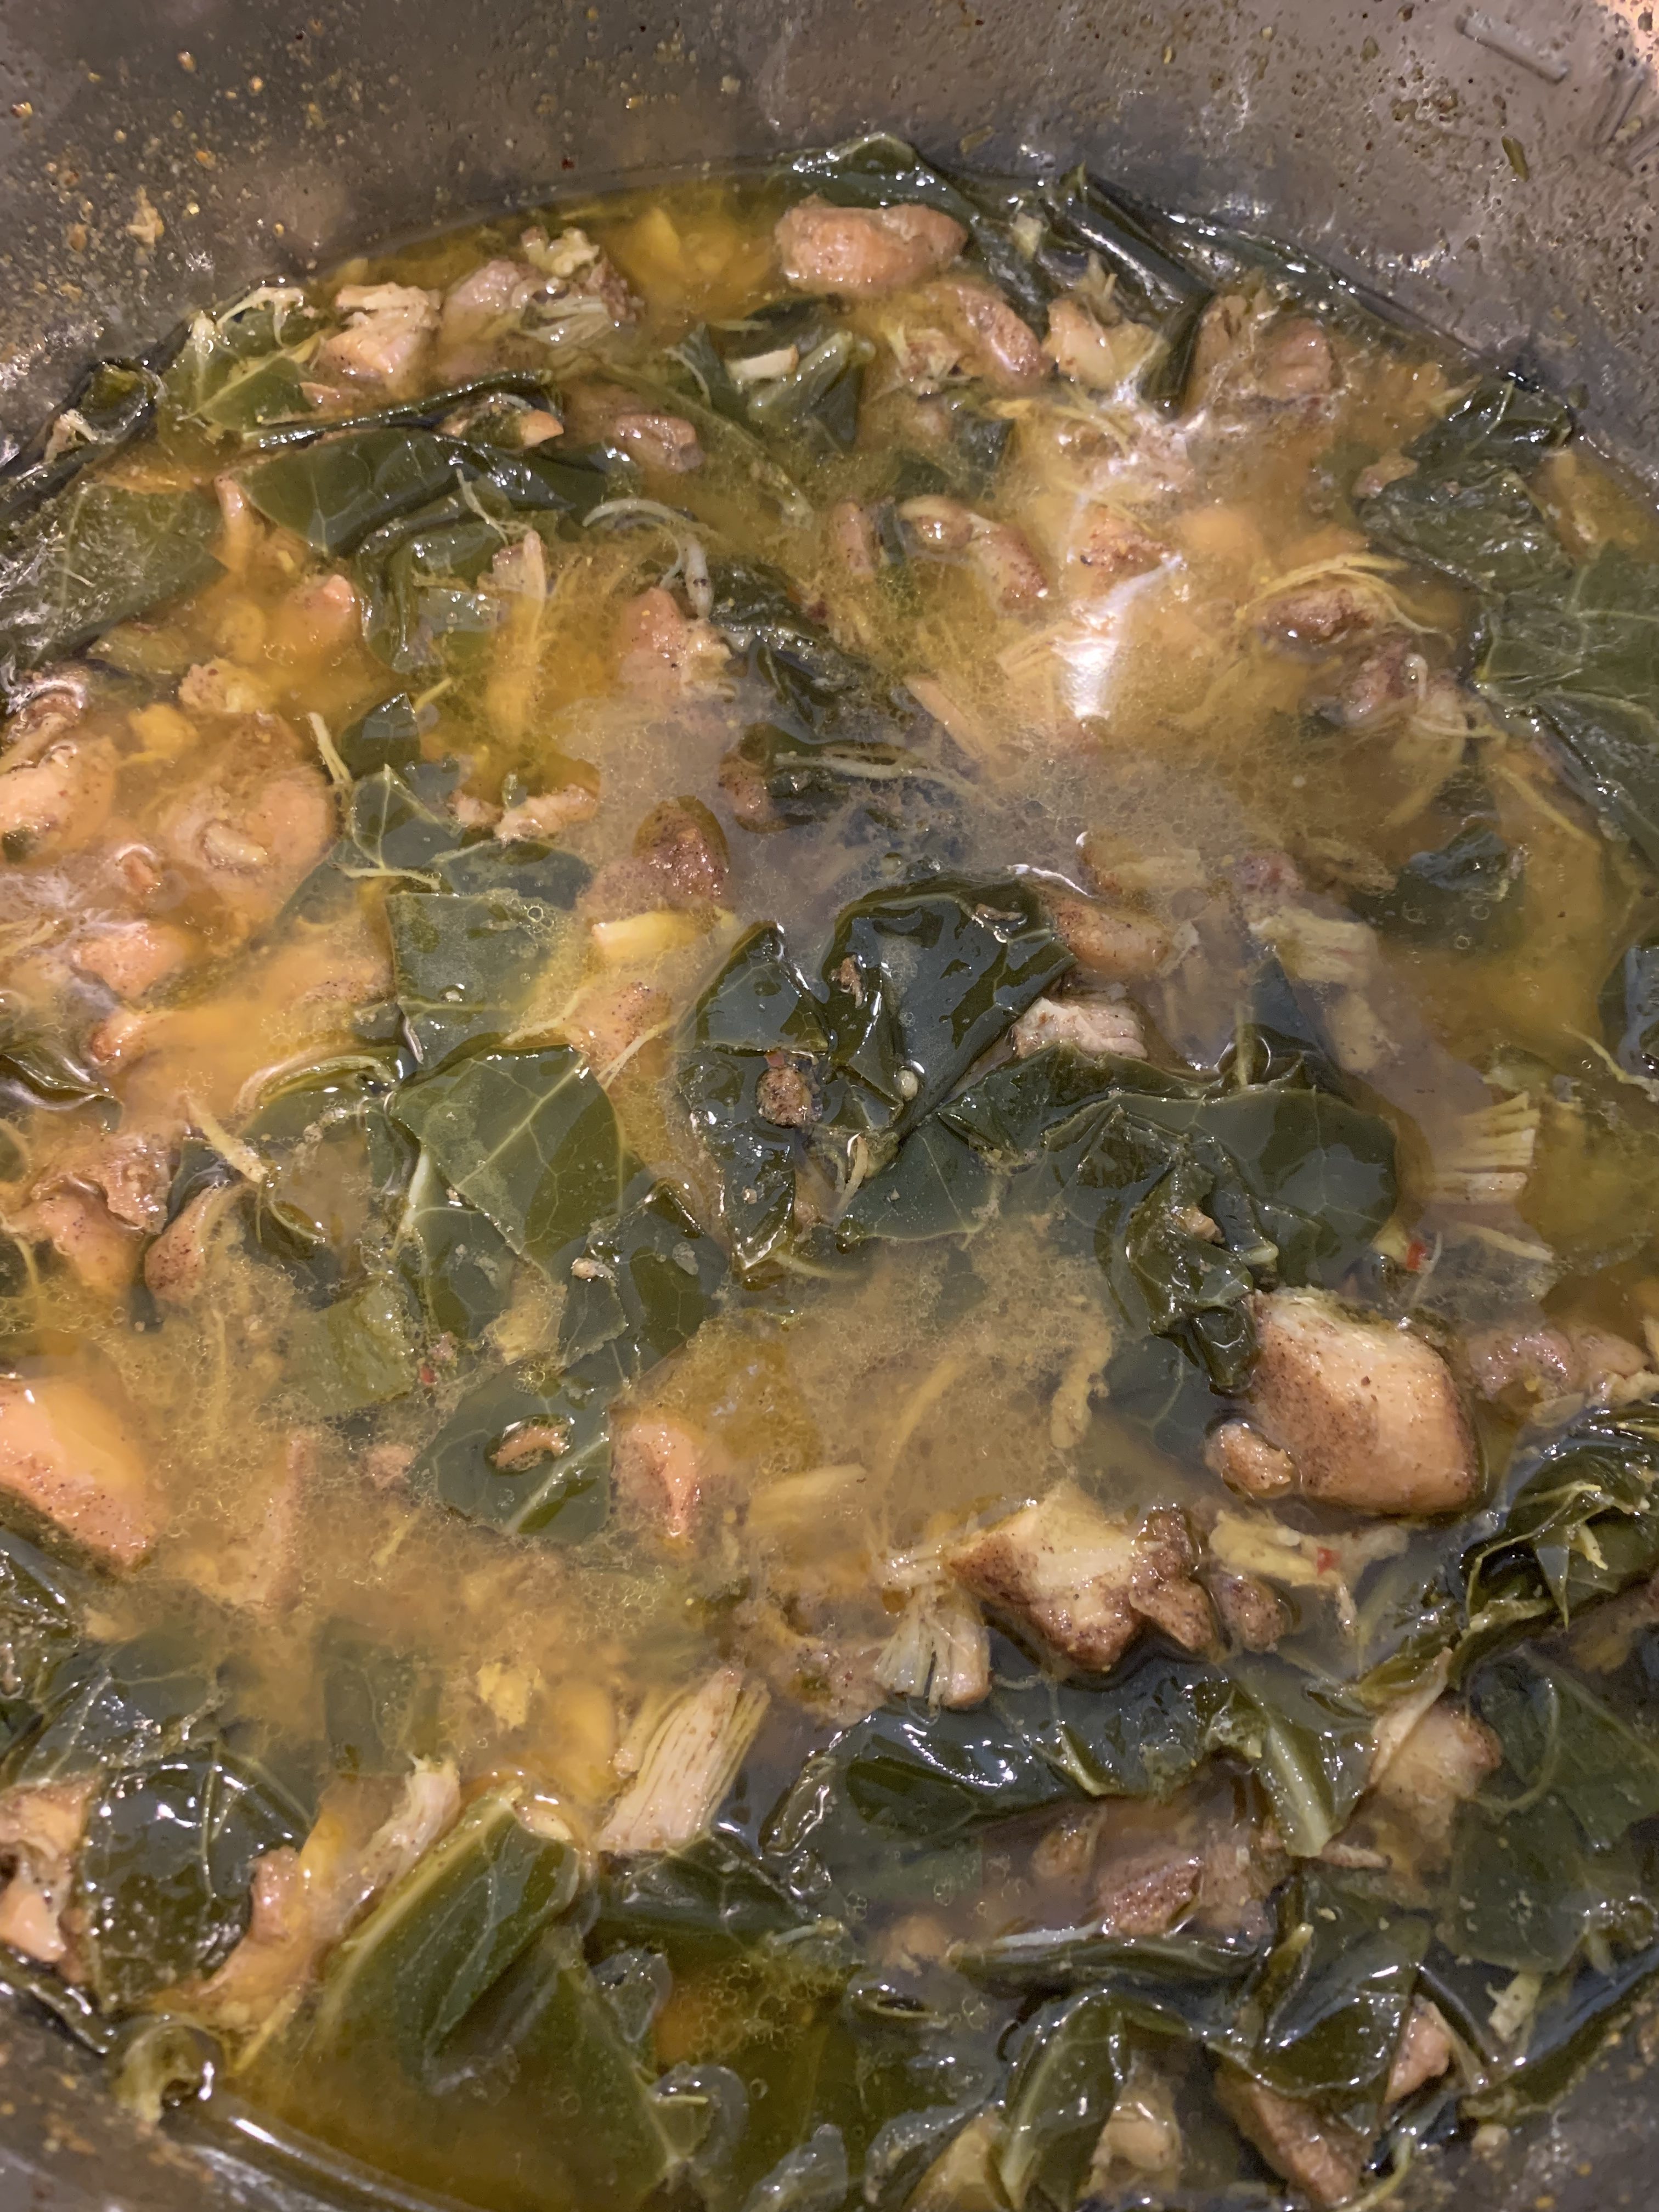
During the ten minutes of natural release, tear a bunch of collard greens into bite size pieces, making sure to remove the thick stems, then wash them in a salad spinner. If you can find callaloo, use it instead of the collard greens, as it’s much more authentic. I didn’t feel like hunting it down, so collard greens it was. Once the Instant Pot is able to be opened, add the collard greens to the chicken, stir them to wilt, then put the lid back on and pressure cook for another 5 minutes. Use the quick release, add up to two teaspoons of salt, and you have your stew. Serve it on its own or over cauliflower rice. Be careful dishing it up, especially if you have white countertops like I do, because the turmeric in the curry powder can stain. For the non-keto folks in your life, this would be great over mashed sweet potatoes or with some fried ripe plantains. This is one of those meals that ends up better after it sits overnight, so it’s perfect for meal-prep.

As an Amazon Associate I earn from qualifying purchases. Any embedded link to a product earns me a portion of the purchase price if you click and buy it.
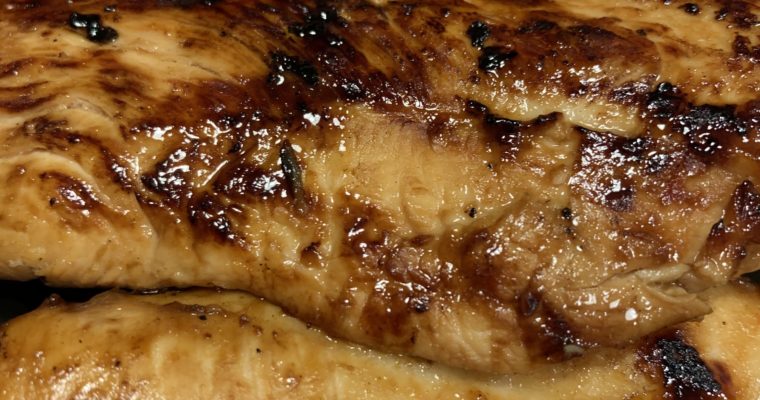
Grilled chicken with a sweet and spicy Korean-inspired marinade, perfect for keto and low-carb diets as well as Weight Watchers Freestyle.
Recent Comments